
@Agents.md instantiate
Autor: amoerke
Minecraft Bedrock – Switch Custom Servers

In den DNS Einstellungen zum Netzwerk (bspw. groundControl) folgendes eintragen:
JSON
Primary DNS: 104.238.130.180
Secondary DNS: 008.008.008.008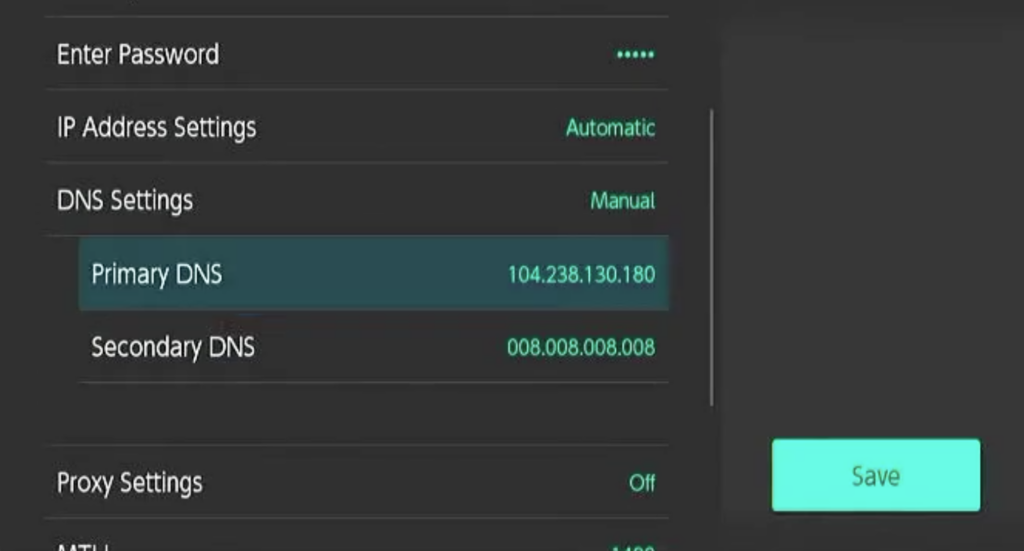
Quelle Youtube:
Charles Proxy einrichten für iPhone
Auf dem iPhone den Proxy mit IP und Port dazwischenhängen (bspw: 192.168.200.146:8888)
Auf die Seite chls.pro/ssl navigieren und das Profil laden
Das Profil in den Einstellungen laden
WICHTIG: Unter Allgemein > Info > ganz unten Zertifikatseinstellungen > Zertifikat vertrauen
Dann prüfen, ob der Netzverkehr im Charles gemonitort wird!
Windows SVG Vorschau

Logi Keyboard
FN-Multimedia-Tastenkombination umstellen
FN + Esc
Fehlend Importe beim Speichern

Using the Command Palette (CMD + SHIFT + P), open the option Preferences: Open User Settings (JSON):
TypeScript
"editor.codeActionsOnSave": {
    "source.organizeImports": true,
    "source.addMissingImports": true
},Git + Bitbucket
Bitbucket
Wichtig:
NICHT:
git clone https://fenomedia@bitbucket.org/fenomedia/homepage-3d.gitCode-Sprache: PHP (php)SONDERN:
git clone fenomedia@bitbucket.org:fenomedia/homepage-3d.git Code-Sprache: PHP (php)SSH Authentifizierung
Install OpenSSH on macOS
A version of OpenSSH should be pre-installed on macOS. To check if OpenSSH is installed, open a terminal and run:
<code>ssh -V</code>Code-Sprache: HTML, XML (xml)The output should show the installed version of OpenSSH.
To use Homebrew to install a newer version of OpenSSH, run:
<code>brew install openssh</code>Code-Sprache: HTML, XML (xml)To check that OpenSSH was installed successfully, run:
<code>ssh -V</code>Code-Sprache: HTML, XML (xml)The output should show the installed version of OpenSSH.
Start the SSH agent
To allow git to use your SSH key, an SSH agent needs to be running on your device.
To check if it is already running, run the ps command. If the ssh-agent is already running, it should appear in the output, such as:
<code>$ ps -a | grep ssh-agent </code>
<code>myusername 3291 0.0 0.0 6028 464 ? Ss 07:29 0:00 ssh-agent</code>Code-Sprache: HTML, XML (xml)
To start the agent, run:
<code>eval $(ssh-agent)</code>Code-Sprache: HTML, XML (xml)You may need to add this command to your ~/.bashrc, ~/.zshrc, ~/.profile, or equivalent shell configuration file. Adding this command to a shell configuration file will ensure the agent is running when you open a terminal.
Create an SSH key pair
To create an SSH key pair:
- Open a terminal and navigate to your home or user directory using cd, for example:
<code>cd ~</code>Code-Sprache: HTML, XML (xml)- Generate a SSH key pair using ssh-keygen, such as:
ssh-keygen -t ed25519 -b 4096 -C "{username@emaildomain.com}" -f {ssh-key-name}Code-Sprache: JavaScript (javascript)- Where:
- {username@emaildomain.com} is the email address associated with the Bitbucket Cloud account, such as your work email account.
- {ssh-key-name} is the output filename for the keys. We recommend using a identifiable name such as bitbucket_work.
- When prompted to Enter passphrase, you can either provide a password or leave the password empty. If you input a password, you will be prompted for this password each time SSH is used, such as using Git command that contact Bitbucket Cloud (such as git push, git pull, and git fetch). Providing a password will prevent other users with access to the device from using your keys.
Once complete, ssh-keygen will output two files:
- {ssh-key-name} — the private key.
- {ssh-key-name}.pub — the public key.
Add your key to the SSH agent
To add the SSH key to your SSH agent (ssh-agent):
- Run the following command, replacing the {ssh-key-name} with the name of the private key:
ssh-add ~/{ssh-key-name}- To ensure the correct SSH key is used when connecting to Bitbucket, update or create your SSH configuration file (~/.ssh/config) with the following settings:
Host bitbucket.org
 AddKeysToAgent yes
IdentityFile ~/.ssh/{ssh-key-name}Code-Sprache: JavaScript (javascript)- Where {ssh-key-name} is the location of the private key file once it has been added to the ssh-agent.
Provide Bitbucket Cloud with your public key
To add an SSH key to a Bitbucket repository:
- At bitbucket.org, navigate to the repository and select Repository settings.
- Under Security, select Access keys.
- Select Add key.
- In the Add SSH key dialog, provide a Label to help you identify which key you are adding. For example, Work Laptop <Manufacturer> <Model>. A meaning full label will help you identify old or unwanted keys in the future.
- Open the public SSH key file (public keys have the .pub file extension) in a text editor. The public key should be in the .ssh/ directory of your user (or home) directory. The contents will be similar to:
ssh-ed25529 LLoWYaPswHzVqQ7L7B07LzIJbntgmHqrE40t17nGXL71QX9IoFGKYoF5pJKUMvR+DZotTm user@example.comCode-Sprache: CSS (css)- Copy the contents of the public key file and paste the key into the Key field of the Add SSH key dialog.
- Select Add SSH key.
- If the key is added successfully, the dialog will close and the key will be listed on the Access keys page.
- If you receive the error That SSH key is invalid, check that you copied the entire contents of the public key (.pub file).
Check that your SSH authentication works
To test that the SSH key was added successfully, open a terminal on your device and run the following command:
<code>ssh -T git@bitbucket.org</code>Code-Sprache: HTML, XML (xml)If SSH can successfully connect with Bitbucket using your SSH keys, the command will produce output similar to:
<code>authenticated via ssh key. </code>Code-Sprache: HTML, XML (xml)Simple Touchdeviceerkennung in JS

JavaScript
const isTouchDevice = "ontouchstart" in document.documentElementSchlüssel eines Objektes als feste Typen

Hier am Beispiel einer Localization-Klasse
TypeScript
/**
 * Localization class to manage translations and language settings.
 */


export default class Localization {
    private static translations = {
        en: {
            right: "That's correct.",
            wrong: "Unfortunately, this is wrong.",
            next: "Next Step",
            step: "Step"
        },
        de: {
            right: "Das stimmt.",
            wrong: "Das ist leider falsch.",
            next: "Nächster Schritt",
            step: "Schritt"
        }
    } as const;

    private static currentLang: keyof typeof Localization.translations = 'de';

    public static translate(key: keyof typeof Localization.translations['de']): string {
        return Localization.translations[Localization.currentLang][key];
    }

    public static setLanguage(lang: keyof typeof Localization.translations) {
        Localization.currentLang = lang;
    }

    public static getLanguage(): string {
        return Localization.currentLang;
    }
}TypeScript // forceModuleDetection
Damit Typescript immer im Module-Modus kompiliert und entsprechend den Scope beachtet immer die CompilerOption setzen:
TypeScript
"moduleDetetection": "force"