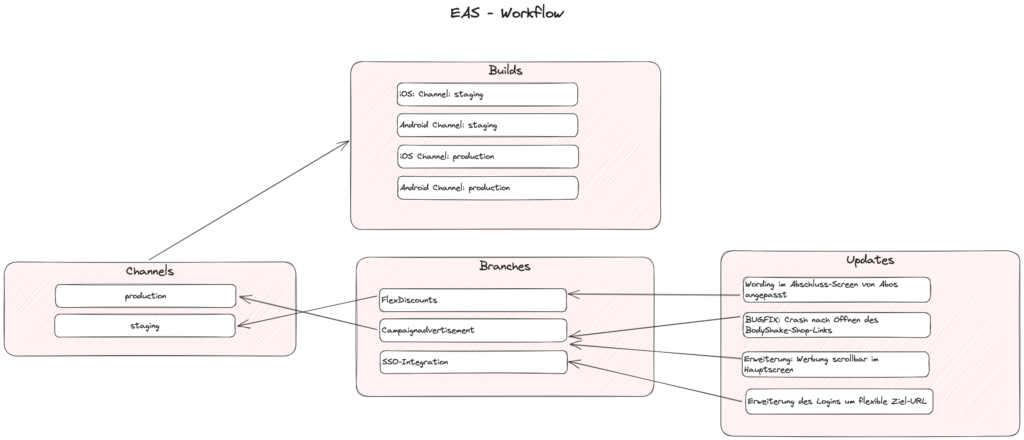
In der EAS – Konfiguration eas.json im Projektverzeichnis werden grundlegend die Channels und deren Eigenschaften festgelegt. Es werden die Profile „stage“ und „production“ festgelegt und welchen Channels diese zuzuordnen sind. (Bspw. stage gehört zum Channel staging)
Wenn man nun ein Release in der EAS-Cloud bauen lässt, wird dieses automatisch dem jeweiligen Channel zugeordnet.
Man kann Branches anlegen, diese einem Channel zuweisen, wiederum Updates einspielen und diese einem Branch zuweisen. (Kette)
Somit ist man in der Lage einen Build, bspw. Production schnell auf einen vorigen Branch zurückzustellen.
Updates werden über den Branch in den zugewiesen Channels übertragen und OHNE neues Release im Store sofort per Over The Air Update ausgerollt. Nutzer bekommen dieses Update automatisch ausgeliefert.
With $name or ${name:default}, you can insert the value of a variable. When a variable isn’t set, its default or the empty string is inserted. When a variable is unknown (that is, its name isn’t defined) the name of the variable is inserted and it is transformed into a placeholder.
The following variables can be used:
TM_SELECTED_TEXT The currently selected text or the empty string
TM_CURRENT_LINE The contents of the current line
TM_CURRENT_WORD The contents of the word under cursor or the empty string
TM_LINE_INDEX The zero-index based line number
TM_LINE_NUMBER The one-index based line number
TM_FILENAME The filename of the current document
TM_FILENAME_BASE The filename of the current document without its extensions
TM_DIRECTORY The directory of the current document
TM_FILEPATH The full file path of the current document
RELATIVE_FILEPATH The relative (to the opened workspace or folder) file path of the current document
CLIPBOARD The contents of your clipboard
WORKSPACE_NAME The name of the opened workspace or folder
WORKSPACE_FOLDER The path of the opened workspace or folder
CURSOR_INDEX The zero-index based cursor number
CURSOR_NUMBER The one-index based cursor number
For inserting the current date and time:
CURRENT_YEAR The current year
CURRENT_YEAR_SHORT The current year’s last two digits
CURRENT_MONTH The month as two digits (example ’02‘)
CURRENT_MONTH_NAME The full name of the month (example ‚July‘)
CURRENT_MONTH_NAME_SHORT The short name of the month (example ‚Jul‘)
CURRENT_DATE The day of the month as two digits (example ’08‘)
CURRENT_DAY_NAME The name of day (example ‚Monday‘)
CURRENT_DAY_NAME_SHORT The short name of the day (example ‚Mon‘)
CURRENT_HOUR The current hour in 24-hour clock format
CURRENT_MINUTE The current minute as two digits
CURRENT_SECOND The current second as two digits
CURRENT_SECONDS_UNIX The number of seconds since the Unix epoch
CURRENT_TIMEZONE_OFFSET The current UTC time zone offset as +HH:MM or -HH:MM (example -07:00).
For inserting random values:
RANDOM 6 random Base-10 digits
RANDOM_HEX 6 random Base-16 digits
UUID A Version 4 UUID
For inserting line or block comments, honoring the current language:
BLOCK_COMMENT_START Example output: in PHP /* or in HTML <!--
BLOCK_COMMENT_END Example output: in PHP */ or in HTML -->
Für das Upgrade eines bestehenden Projektes sollte man folgendem Guide folgen ExpoBlog
Wenn man die ReactNavigation implementiert hat, muss man die Bibliothek react-native-gesture-handler entfernen, da Expo diese selbst integriert hat und sonst mit folgender Fehlermeldung quittiert:
Tried to register two views with the same name RNGestureHandlerButtonCode-Sprache:JavaScript(javascript)
Deshalb folgende Vorgehensweise:
Alle laufenden Instanzen der App schließen
node_modules – Ordner löschen
package-lock.json löschen
react-native-gesture-handler aus package.json entfernen
Um die Vercel Edge-Functions nutzen zu können, muss das Projekt mit der aktuellsten Next.JS Version erstellt worden sein. Im API-Endpunkt muss folgende Konfiguration eingefügt werden:
Edge-Functions sind defacto eine Erweiterung der Serverless-Functions. Das Problem bei den bisherigen Serverless Functions ist folgendes. Wenn ein Request an das API mit einer Serverless Function gemacht wird, hängt die Latenz von zwei Faktoren ab.
Der erste Faktor ist die Location von der der Request gemacht wird. Der zweite Faktor ist die Location wo das API gehostet ist. Desto höher die Entfernung zwischen den beiden Punkten ist, desto höher ist die Antwortzeit. Das kann bei hochfrequentierten APIs schnell zum Problem werden.
Um dieses Problem aufzulösen gibt es die sogenannten Edge-Functions. Bei diesen Funktionen wird ein Netzwerk genutzt und die Funktion auf dem Server, welcher am nächsten an der Anfrage ist, ausgeführt.
Damit ist sichergestellt, dass die Entfernung so kurz wie möglich ist.
Um dir ein optimales Erlebnis zu bieten, verwenden wir Technologien wie Cookies, um Geräteinformationen zu speichern und/oder darauf zuzugreifen. Wenn du diesen Technologien zustimmst, können wir Daten wie das Surfverhalten oder eindeutige IDs auf dieser Website verarbeiten. Wenn du deine Zustimmung nicht erteilst oder zurückziehst, können bestimmte Merkmale und Funktionen beeinträchtigt werden.
Funktional
Immer aktiv
Die technische Speicherung oder der Zugang ist unbedingt erforderlich für den rechtmäßigen Zweck, die Nutzung eines bestimmten Dienstes zu ermöglichen, der vom Teilnehmer oder Nutzer ausdrücklich gewünscht wird, oder für den alleinigen Zweck, die Übertragung einer Nachricht über ein elektronisches Kommunikationsnetz durchzuführen.
Vorlieben
Die technische Speicherung oder der Zugriff ist für den rechtmäßigen Zweck der Speicherung von Präferenzen erforderlich, die nicht vom Abonnenten oder Benutzer angefordert wurden.
Statistiken
Die technische Speicherung oder der Zugriff, der ausschließlich zu statistischen Zwecken erfolgt.Die technische Speicherung oder der Zugriff, der ausschließlich zu anonymen statistischen Zwecken verwendet wird. Ohne eine Vorladung, die freiwillige Zustimmung deines Internetdienstanbieters oder zusätzliche Aufzeichnungen von Dritten können die zu diesem Zweck gespeicherten oder abgerufenen Informationen allein in der Regel nicht dazu verwendet werden, dich zu identifizieren.
Marketing
Die technische Speicherung oder der Zugriff ist erforderlich, um Nutzerprofile zu erstellen, um Werbung zu versenden oder um den Nutzer auf einer Website oder über mehrere Websites hinweg zu ähnlichen Marketingzwecken zu verfolgen.